Well, what is it?
Frankly, you should be knowing this already. But it’s never late to learn. 🙂 So, here you go:
Localization is the process of translating your app into multiple languages. But before you can localize your app, you internationalize it. Internationalization is the process of making your app able to adapt to different languages, regions, and cultures.
In essence, Localization for most part is displaying translated texts in the application in accordance to the device language. Localization is also part of Internationalization while it also includes using appropriate image assets, updating regional currency and timezone as per the region and language.
If you don’t have a project handy to localize, download the iRemind application source code from here to work with. You might as well use a Swift Playground for testing few of the things. (Xcode -> File -> New -> Playground)
Pre-Requisite: Enabling project for Localization
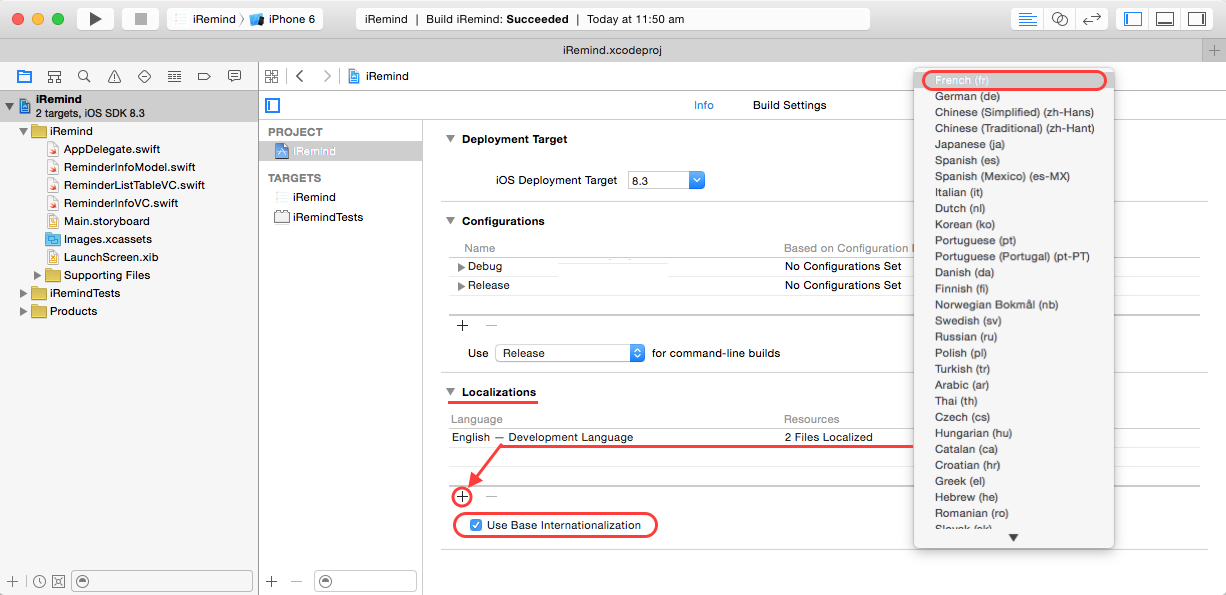
In order to provide translations to different languages, we should enable Localization in the project as a prerequisite. Which is done as shown below. (Note: Your project may have it enabled already if you are using the latest Xcode)
- Xcode Project: Project -> Info -> Select “Use Base Internationalization“
- Xcode Project: Project -> Info -> Localizations: Select “+” and choose the languages you want to support.
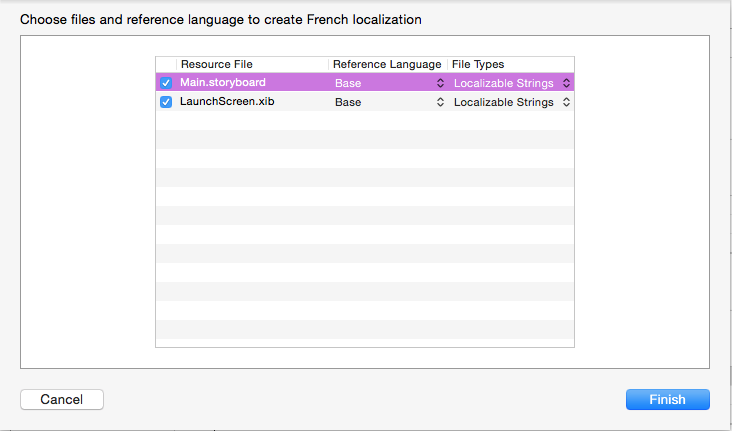
In the below example the application is localized to French. Once you add a language, you will be prompted to select the files to localize, such as the Main.storyboad or LaunchScreen.xib. Leave those selected unless you don’t want to localize them.
1. Localizing Text in the Application
For localizing labels and other text that is connected to an outlet localization can be applied programatically by using a simple function.
func NSLocalizedString(key: String, tableName: String? = default, bundle: NSBundle = default, value: String = default, #comment: String) -> String
Which can be shortened as below by omitting the parameters which have “default” values.
NSLocalizedString(“key”, comment: “comment”)
This function returns the localized/translated text of the supplied “key” from the strings file. Sample implementation looks like below.
// Non localized
self.mylabel.text = “Name”
// Localized
self.mylabel.text = NSLocalizedString(“Name”, comment: "Comment")
NOTE: This is different from the Objective-C equivalent, which is a macro.
Which means we are not done as yet. For this requires us to provide the Localizations for the key in the localizable.strings file. i.e., we need to create a strings file and add the translated values for various keys after localizing the strings file for different languages.
Adding Localizable.strings file
- Xcode: Project -> New File
- iOS : Resources -> Strings file

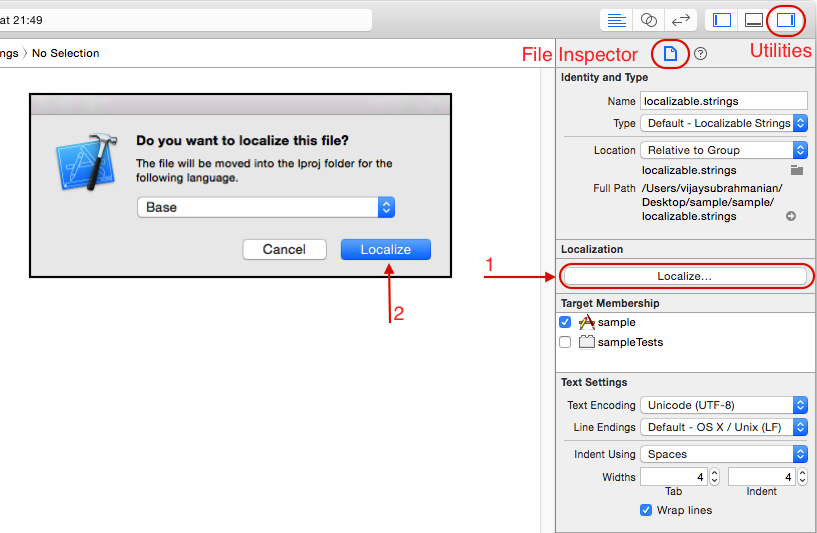
Localizing the localizable.string file
Open localizable.strings file -> Inspector -> localize
Now we have two different files for English and French. To provide the french text for “Name” which is “Nom”, open the localizable.strings file in fr.lproj and add the translations as below. (As a key value pair)
“Name” = “Nom”
(Since we are using NSLocalizedString while setting the label text, The appropriate value is extracted based on the selected device locale.)
Testing:
Run the application. From iPhone Simulator or a device,
Go to iOS Settings -> General -> Language and Locale -> Language -> French
Relaunch the application and voila! 🙂
2. Localizing Images
For asset catalog images, the option is to provide different image names with a suitable prefix for various languages and add them as the values for image name keys in the Localization string file for under various locales.
* Note: This is because asset catalogs cannot be internationalized.
self.imageView.image = UIImage(named: NSLocalizedString(“ImageName”, comment: "ImageName"))
3. Localizing Resource files
Any resource file in the application can be localized (similar to the localizable.strings file described in step 1) by selecting the file and clicking on:
Inspector -> localize
Localizing this way requires you to add the corresponding files under the localization folders such as en.lproj or fr.lproj.
4. Localizing Storyboards
While enabling the project to be localized in the Pre-Requisite, we had localized the Main.Storyboard and the LaunchScreen.Xib files as well. (In case you have added a new storyboard or Xib file, you can localize it the same way as the localizable.strings file described in step 1). Once the storyboard is localized, you will notice that the Main.storyboard in your application shows a collapsable icon in the file navigator. If you expand it, you will find that the Xcode has added a Main.strings (French) file automatically where you can set the translated texts for UI elements such as UILabels, update them as below:
/* Class = "UILabel"; text = "Name:"; ObjectID = "gCq-Ww-rgP"; */
"gCq-Ww-rgP.text" = “Nom:";
Updating the value “Name:” with the translated string “Nom:” for French.

* Note: Changing the Identifier key is not something you want to do for applying the localization.
4. Formatting Currency and Numbers
Currency and numbers can be formatted according to the device region by using NSCurrencyFormatter and NSNumberFormatter as shown below.
let numFormatter = NSNumberFormatter()
numFormatter.numberStyle = .DecimalStyle
let numAsString = numFormatter.stringFromNumber(12345)
// RESULT: numAsString = “12,345"
numFormatter.numberStyle = .CurrencyStyle
let currencyAsString = numFormatter.stringFromNumber(12345)
// RESULT: currencyAsString = "$12,345.00"
5. Formatting Timezone and Date
Using correct timezone is vital for applications that have time specific data or even applications that offer reminders.
the defaultTimeZone() function of the NSTimeZone class returns the default Time Zone based on the device settings.
// Using TimeZone
let currentDate = NSDate()
let myTimeZone = NSTimeZone.defaultTimeZone()
let daylightSavingOffset = myTimeZone.daylightSavingTimeOffsetForDate(currentDate)
let abbreviationForDate = myTimeZone.abbreviationForDate(currentDate)
let secsFromGMT = myTimeZone.secondsFromGMTForDate(currentDate)
let abbreviation = myTimeZone.localizedName(.Standard, locale: NSLocale.currentLocale())

// Using DateFormatter
let dateFormatter = NSDateFormatter()
dateFormatter.locale = NSLocale.currentLocale()
dateFormatter.timeZone = NSTimeZone.defaultTimeZone()
dateFormatter.dateStyle = .LongStyle
let formattedDate = dateFormatter.stringFromDate(currentDate)

// Examples
// When the locale is set as English:
dateFormatter.locale = NSLocale(localeIdentifier: "en")
// RESULT: formattedDate = "June 22, 2015"

// When the locale is set as French:
dateFormatter.locale = NSLocale(localeIdentifier: "fr")
// RESULT: formattedDate = "22 juin 2015"
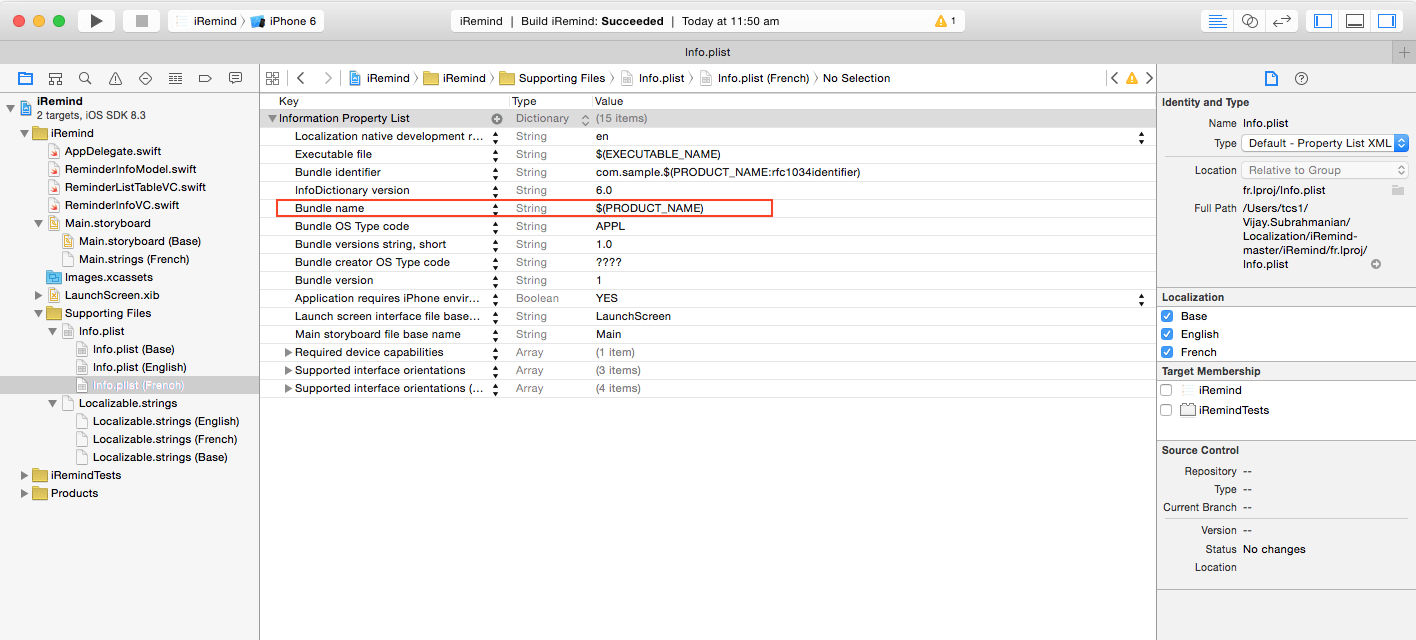
6. Updating Application Name
If you want to change the application name for a different locale, you can do that by changing the “Bundle name” parameter in the localized “Info.plist” file in the application bundle.
Where to go from here?
I would say start with localizing your application and by testing it 🙂
Few related areas include using Auto Layouts for handling changes in the text for different languages (i.e., if the translation results in a longer text, we might have to adjust the frames of labels etc. in order to accommodate the text). There are also some Right-to-Left languages which require mirroring the UI and lots more.
Thanks for reading!
References:
- Apple: Internationalization Resources
- Apple: Internationalization and Localization Guide: About Internationalization and Localization
- Apple: Internationalization and Localization Guide: Internationalizing the User Interface
- Apple: Internationalization and Localization Guide: Localizing Your App
- Apple: Formatting Data Using the Locale Settings
- Ray Wenderlich: Internationalization Tutorial for iOS (Objective C)

Thanks for this cool summary.
Can you cover the update of storyboard localizable strings file, after updating the main storyboard (adding new screen or elements by example).
Do you have a smooth method to have these files updated correctly in this case?
LikeLike
Hi Yves!
Thanks for reading and glad you liked this post 🙂 As per your request, I have added a post to Localizing Storyboards and XIB’s including how to update the localizable strings. Hope it will be helpful!
Localizing Storyboards and XIB’s
LikeLike